
Add an age check to your site with a single script tag. Visitors verify with the ChainIT ID app before they reach your content.
Before you start
You need three things in place.
- A rule, which decides who passes. See Configure your age rules.
- An embed event, which connects that rule to your site. It has to be saved before you can generate a token. See Create an Age App event.
- Somewhere to put a script tag on your site, and a way to test on staging before going live.
Step 1: open your event's embed settings
- Sign in to the Business Portal, then open Age App, then Events.
- Find your embed event and click the three-dot menu at the end of its row.
- Choose Edit, then scroll to Embed Integration Setup.
- Click Embed Integration, or the pencil icon beside the section heading if the event already has a token.

Step 2: configure your domains and URLs
The Embed Configuration window has four fields.
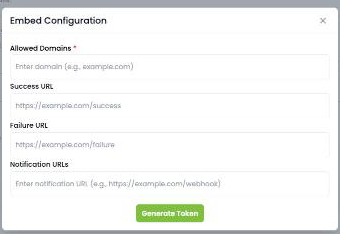
- Allowed Domains is required. It lists the sites permitted to use your token, which stops anyone else from using it on their own site. Enter the full URL including
https://, then press Enter to add it. Repeat for each domain. - Success URL is where visitors go after passing. Optional.
- Failure URL is where visitors go after failing. Optional.
- Notification URLs is a webhook address that receives verification results. Optional.
Step 3: generate your token and save
- Click Generate Token.
- Copy the embed script that appears below the token. It already carries the token and your URLs.
- Click Save in the window, then Done on the event page.
The token appears masked, with a copy button and an eye toggle to reveal it.
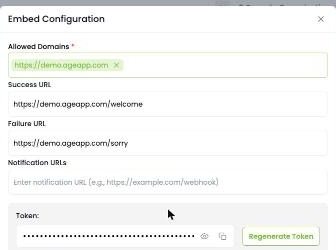
Treat the token as a credential. It is tied to your organization and your allowed domains. Keep it out of public repositories. If it is ever exposed, use Regenerate Token and update the script on your site with the new token at the same time.
Step 4: add the container to your page
The script does not create its own space on the page. You have to give it one.
Add an empty element with the ID embed-qr-code wherever you want the QR code to appear:
<div id="embed-qr-code"></div>
Without it, nothing renders. The browser console logs QR Container not found and the page otherwise looks normal, so this is an easy failure to miss.
Step 5: add the script to your site
Paste the script you copied into your site near the closing body tag, after the container element:
<script src="https://cdn.jsdelivr.net/gh/ChainIT-Inc/bit-age-app-scripts@1.x.x/script.min.js" data-api-key="your-token-here" data-success-url="https://yoursite.com/welcome" data-failure-url="https://yoursite.com/sorry" ></script>
The script the portal copies out may show gh/Black-Ink-Technologies/ in the src instead of gh/ChainIT-Inc/. Both addresses load the same file.
The script reads four attributes:
data-api-keyis required and is the token you generated.data-success-url,data-failure-urlanddata-notification-urlare optional, and override the values saved on the event.
Step 6: test before you go live
Add your staging domain to Allowed Domains and test there first. Check that:
- The QR code appears.
- A passing visitor reaches your success URL.
- A failing visitor reaches your failure URL.
Remove the staging domain when you are done.
Step 7: go live
Add your production domain to Allowed Domains, deploy the script, and load the page as a visitor to confirm the age check appears.
Checking what happened
Every verification is recorded. To pull the history for a date range, see Age verification reports.
Your organization is responsible for determining the age-verification and identity-assurance requirements that apply to its business and jurisdictions. My Age App and the Business Rules Engine evaluate the conditions your organization configures; they do not independently determine the applicable legal or regulatory requirement.